Steps for conducting the experiment
General Instructions
Follow are the steps to be followed in general to perform the experiments in Software Engineering Virtual Lab.
- Read the theory about the experiment
- View the simulation provided for a chosen, related problem
- Take the self evaluation to judge your understanding (optional, but recommended)
- Solve the given list of exercises
Experiment Specific Instructions
Following are the instructions specifically for this experiment:
Generating Control Flow Graph with gcc
This experiment uses gcc to compile C programs. The gcc compiler provides numerous switches to control the operation. We make use of two such switches, -fdump-tree-vcg and -fdump-tree-cfg for our purpose.
As an example, consider the following simple C program:
#include <stdio.h>

int
main(int argc, char **argv)
{
	int n = 10;
	printf("Value of n: %d\n", n);

	return 0;
}
If we compile the above program (stored in a file with name say, test.c) in the following way: gcc -c -fdump-tree-vcg -fdump-tree-cfg test.c it generates three files: test.o, test.c.013t.cfg and test.c.006t.vcg. The first file contains the object code. The second file, test.c.013t.cfg, contains the basic blocks as identified by the compiler:
;; Function main (main)

Merging blocks 2 and 3
main (int argc, char * * argv)
{
  int n;
  int D.1705;
  const char * restrict D.1704;

<bb 2>:
  n = 10;
  D.1704 = (const char * restrict) "Value of n: %d\n";
  printf (D.1704, n);
  D.1705 = 0;
  return D.1705;

}
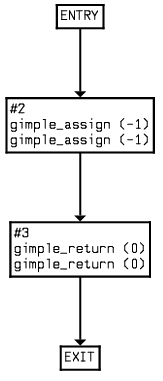
Contents of the third file, test.c.006t.vcg, gives graph representation of the corresponding CFG:
graph: { title: "main"
node: { title: "ENTRY" label: "ENTRY" }
node: { title: "EXIT" label: "EXIT" }
edge: { sourcename: "ENTRY" targetname: "2" linestyle: solid priority: 100 }

node: { title: "2" label: "#2\ngimple_assign (-1)\ngimple_assign (-1)"}
edge: { sourcename: "2" targetname: "3" priority: 100 linestyle: solid }

node: { title: "3" label: "#3\ngimple_return (0)\ngimple_return (0)"}
edge: { sourcename: "3" targetname: "EXIT" priority: 100 linestyle: solid }
}
The following image shows a graphical representation of the above:

Note that the graph string does not contain our original variables from the program. Instead gcc translates the high-level program into an intermediate representation using GIMPLE. However, the CFG drawn is as per the basic blocks identified by gcc.
Following are the steps to work on the exercises for this experiment:
- Write the C program in the given code area. This program should be a valid C program. Otherwise, the compilation would fail.
- Click on the "Compile program" button to invoke gcc with the above discussed switches.
- If the code is not syntactically correct, any error thrown during compilation would appear in the area below the button
- If compilation is successful, the basic blocks and the CFG corresponding to the program would be shown near the bottom of the page
- To verify your solution, click on the "Submit" button below the problem statement. This would move you to the bottom of the page. Next click on the View Solution" button to display the solution.

 Introduction
 Theory
 Simulation
 Case Study
 Self-evaluation
 Procedure
 Exercises
 References

